
Table of Contents
- What is a Check Socket?
- How to place an order
- Design Options
- Measurements Required
- Fabrication Instructions
- FAQs
What is a Check Socket?
A check socket is used to evaluate the fit and adjust the design of a socket. Check sockets are printed in a clear PETG that allows a practitioner to see inside to find pressure points and other problem areas. Protosthetics check sockets are reliable, quickly printed, and offer unique features like circular cutouts or lamination shells.
They can be printed in clear PETG on a Galileo Pro, Galileo Pro 2, and Galileo O&P.
How to Order a Check Socket
- Before ordering this product, clinician preferences must be established with the Protosthetics design team. If you have not set up or want to update your clinician preferences, please schedule a meeting with your design lead by emailing success@protosthetics.com.
- Log into FabOne, and click “Order” under the Above Knee or Below Knee Check Socket section.
- Attach a scan of the limb, cast, socket, or plaster positive.
- Select “Files not required” at the top of the page for ordering by measurements.
- Proceed to the order form to fill out the requested details.
Choosing your scan medium
If you have questions on your which scan medium to choose when placing an order see our in depth guide Here!
Design Options on the Order Form
Check sockets can be ordered in a pair with a flexible inner socket printed in TPU Cheetah. To do so, please enter the flexible inner as the first product type and check socket as the second product type. This combination is two designs. More information on flexible inner sockets can be found here.
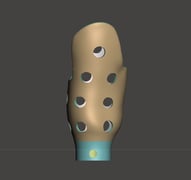
Check Socket with Circular Cutouts
- Circular cutouts in the check sockets allow the practitioner to see the amount of pressure that the socket is applying.
Check Socket with RevoSurface
- Panels, lacing tubes, and holes for surface guides are designed into the print so the socket is ready for Revosurface installation.
- AK window surface locations
- Lateral
- Posterior
- Anterior
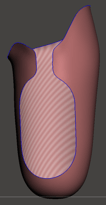
- BK RevoSurface socket design
- Posterior Panel Connected
- Posterior Panel Cut Out
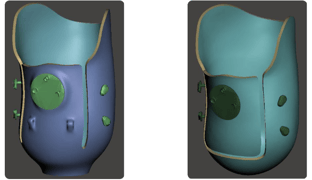
Free Lamination Shell
- Lamination shells are thin prints made of PETG designed to be poured that match the device’s inner surface. Learn more about lamination shells here.
Requires Suction
To print a socket for suction fit, check this box. Smoothing the surface is required after printing to get an airtight seal - see Fabrication Instructions below for more details.
Above Knee Socket Shape
- View the pre-made options for brim shape here, including three-dimensional videos.
- Clinic Custom (must be in your clinician preferences). There are two ways to set up a custom brim with Protosthetics:
- Submit a scan of the brim you want us to use either via success@protosthetics or as an order. You can submit a scan of that brim as a plaster positive, existing socket, or a digital model.
If you choose to submit the scan of the brim as on order via FabOne, the order will be removed after the design lead has received it, so that it doesn’t count against one of your allotted designs. - Create a custom brim by altering a brim that we already provide. In the additional information, describe exactly what you wish to change about an existing brim (example: increase anterior brim height on the CATCAM brim by 1/2”). Feel free to provide photos of your request, which will help us more accurately understand. You can provide custom brim photos and feedback by emailing success@protothetics.com, using our support live chat function, and/or setting up a call with your design lead for discussion.
- Submit a scan of the brim you want us to use either via success@protosthetics or as an order. You can submit a scan of that brim as a plaster positive, existing socket, or a digital model.
Thinner Print, Additional Thickness
-
Thinner or thicker socket walls with the same distal end thickness and adapter options. Wrapping is recommended for all check sockets.
- Thinner print: 2.35mm, faster print for static fittings
- Standard: 4.5mm
- Additional thickness: 6.0mm, requires extra time and material
Distal Adapter/Suspension
-
Find images of all our offered adapters here.
Volume Modifications
- Increase or Decrease
- Volumetric change type - ply, percentage, or other (explain in additional information)
- For complex reductions/increases, specify which regions of the socket you would like to increase, decrease, or exclude from the volumetric changes applied to the whole socket.
- This can be included in clinician preferences for replication across patients.
- Change amount (enter value)
Required Measurements
Measurement Discrepancy Handling
-
Set to measurements
- Go with scan
-
Verify sizes for differences greater than +/- 7 mm
- Designers will automatically reach out for any sizing differences greater than 20 mm.
Below Knee Measurements (*required):
-
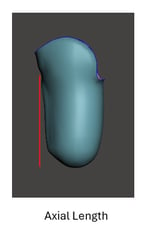
MPT to Distal End (axial length)*
-
-
AP at MPT
-
ML at MPT
-
Proximal ML (above condyle)
-
Circumferences
-
At MPT, 2” below MPT, 4” below MPT are required
-
Above Knee Measurements (*required):
-
Measurement starting point*: IT or perineum
-
Starting point to distal (axial length)*
-
ML at perineum*
-
AP at perineum*
-
Circumferences
-
At starting point, 2” below starting point, 4” below starting point are required
-
Fabrication Instructions
Print check sockets on the Galileo Pro, Galileo Pro 2, or Galileo O&P with PETG in the big nozzle.
Grinding
Break off any support material. Use 100-150 grit sandpaper to remove any residual support material. Use 400-600 grit sandpaper to smooth the trimlines.
Suction
To achieve a suction fit, polish the seam on the internal surface and any layer lines on the internal surface where a sealing ring would make contact with 400-600 grit sand paper.
Heat Modifications
With a heat gun, material is pliable for adjustments at 70C-85C without melting.
Reinforcement
Wrapping check sockets is required for take-home ambulation. Standard thickness check sockets were demonstrated in a fiberglass-wrapped walking test to withstand 100,000+ steps at 280 lbs without damage.